NEW ZEALAND
DEBBY WILLIAMS QUILTFEVER
  • HOME
  • About
    • QUILT RELATED BLOG
    • QUILT FEVER QUIZ
    • FUN BLOG >
      • Vanuatu
  • 1 DAY CLASSES
    • TRICKS OF THE TRADE INTRO CLASS DESCRIPTION >
      • TRICK OF THE TRADE INTRO NEEDS LIST
    • SHAPER STARS CLASS DESCRIPTION >
      • SHAPER STARS NEEDS LIST
    • ENCOMPASSING STARS 1 DAY CLASS DESCRIPTION >
      • ENCOMPASSING STARS 1 DAY NEEDS LIST
    • OLD FASHION HAND QUILTING 1 DAY CLASS DESCRIPTION >
      • OLD FASHION HAND QUILTING NEEDS LIST
    • MY BARGELLO BABY 1 DAY CLASS DESCRIPTION >
      • MY BARGELLO BABY 1 DAY CLASS NEEDS LIST
    • HAND APPLIQUE YOUR WAY 1 DAY CLASS DESCRIPTION >
      • HAND APPLIQUE YOUR WAY NEEDS LIST
  • 2 DAY + CLASSES
    • TRICKS OF THE TRADE CLASS DESCRIPTION >
      • TRICKS OF THE TRADE NEEDS LIST
    • ENCOMPASSING STARS 2 DAY CLASS DESCRIPTION >
      • ENCOMPASSING STARS 2 DAY NEEDS LIST
    • MARINER'S BLISS CLASS DESCRIPTION >
      • MARINER'S BLISS NEEDS LIST
    • BEGINNER'S TOTE 2 DAY CLASS DESCRIPTION >
      • BEGINNER'S TOTE NEEDS LIST
  • gallery
    • HISTORICAL QUILTS >
      • THE FIRST QUILT
      • YO YO INSANITY
      • GRANDMOTHER'S FAN
      • THE PURPLE PINEAPPLE
      • MAY BASKETS
    • ART QUILTS >
      • CONSEQUENCES >
        • INDIVIDUAL BLOCKS
      • ROSE WINDOW
      • GENTLE TEA
      • NATIVE NINE PATCH
      • REINVENTING THE WHEEL
      • DADDY'S BOUQUET
      • CLARITY >
        • clarity words
      • FOREST FELINE
      • JANZOONS
      • POSTCARD CHALLENGE
      • CREATED
      • CITRUS SORBET
      • EMERGED
      • STARLIGHT SONATINA OPUS 8
      • SERENITY
      • OH RUBBISH!!
    • QUILTS FOR CHILDREN >
      • GIRLS HAPPY VILLAGES
      • GRACE'S BUNNY QUILT
      • LUKE'S BABY QUILT
      • CHILDREN'S BIBLE STORY QUILT >
        • CLOSE UPS OF BIBLE BLOCKS
      • BETHS BUTTERFLIES
      • GRACES SYMPOSIUM ENTRY
      • CHILDREN'S SUMMER CLASS
      • GRACE AND BETH CREATE TOTES
    • BED QUILTS >
      • DOUBLE WEDDING RING VARIATION
      • MY SON'S LEAVING HOME QUILT
      • DAD'S TRIP AROUND THE WORLD
      • GOLD ANNIVERSARY CLOSE UP
      • GIRL'S BUNK QUILTS
      • DOUBLE WEDDING RING FOR MUM
      • DRUNKARD'S PATH
      • GRANDMOTHER'S OTHER FAN
      • GRANDPA'S GEESE
      • BARBARA'S TRIP AROUND THE WORLD
    • MOST RECENT QUILTS
    • CLASS CANDIDS >
      • Manutu 2015 Encompassing Stars
      • Manuatu 2015 Shaper Stars
      • TRICKS OF THE TRADE TIMARU the 2nd
      • TRICKS OF THE TRADE TIMARU
      • CLASS CANDIDS 2
      • CLASS CANDIDS 3
      • BRAIDED RIBBONS SYMPOSIUM CLASS PHOTOS- BARGELLO
      • BRAIDED - MARINER'S BLISS
      • BRAIDED - TRICKS OF THE TRADE
      • ROTOITI
    • OTHER QUILT RELATED PHOTOS
  • contact me
    • useful links
  • MY SHOP
    • STARWHIZ
    • BARGELLO BABY

Novice News - Post 1 - Not all fabrics are created equal.

7/25/2014

1 Comment


Cotton vs. Polyesters
Picture
Hopefully some newbies can skip a few headaches by learning from someone who has learned the hard way.  

The concepts being addressed in this series of blogs are going to be 'news' only to the novices out there.  

These novices are often smart, classy women who have no previous experience sewing.  If you are a novice, tune in for the next few weeks for this foundational information.

Let's start at the most basic of basics.  Fabric types.  For a bed quilt, made by traditional methods you will need a specific fabric type. 

Not all fabrics are created equal.  How a fabric is made affects the outcome of the finished product.   Traditional quilts are most often made with 100% cotton fabrics.  Let's consider why.  

Cotton is a natural fibre.  It has short fibres, grown in warm climates. The short fibres are spun into tiny threads which are then spun together into the size needed for weaving or for sewing.  Because the fibres are short several strands need to be twisted together for strength.  

Cotton can be ironed at high temperatures. It is a naturally breathable fibre with good absorption properties.  Cotton accepts dyes readily and feels soft and supple to the touch.  

Polyester is plastic.  It is created by petro-chemicals, formed into ribbons, chipped, melted then drawn and spun while hot. The fibre itself does not absorb moisture readily. The fibres are long and strong. 

It may melt when cotton level heat is applied.  Although it may be strong and useful, and may even be made to look like cotton, it's still going to behave like plastic.  

Poly/cotton mixes are strands of cotton and poly spun together. They afford the strength of poly with the feel of cotton.  Often quilters will use poly cotton threads to sew pieces together or machine quilt their finished top.  These same quilters would not choose poly/cotton fabrics for their creations.

To determine fibre content of old (previously purchased) fabric some quilters use the 'burn' test.  After years of handling fabric most quilters can tell by the 'hand' (textile talk for the feel) of the fabric if it contains poly.  Plastic feels different.  Occasionally a cotton will have starch or sizing in it that will confuse the issue.

What is the burn test?  A tiny bit of fabric (half an inch by two inches is PLENTY) is clipped from the corner, then held over a sink or bowl full of water and set alight.

A narrow slip of fabric can be lighted then blown out immediately- if it burns too quickly it is dropped in the water.   The (cooled) burnt edge of a cotton fabric will feel soft.  Poly feels slightly crunchy or hard.  IT'S PLASTIC.  

*Please do not try testing method this unless you are a rational, careful, sober adult who can be trusted with fire.

Cotton fabrics will hold a crease.  Polyester wants to spring back from creases.  Great for clothing, sheets, or furniture,  however not-so-much for quilts.  

A fabric that holds  a crease is useful in quilting. Sewn seams may be ironed flat and tidy.  Polyester tends to 'poof' or fluff back up after ironing- if it doesn't melt first! 

Rule number one for beginners, use 100% cotton fabrics for your quilting projects. 

Next in this series:  Not all cotton fabrics are created equal.


1 Comment

Aotearoa Quilters Traveling Exhibition

7/21/2014

0 Comments

 
Picture
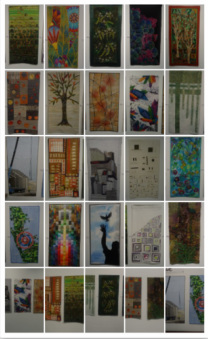
The exhibition has been judged, and 'Prognosis; Hope' (aka Project X)  received a merit award!  Very exciting as this also means it will be among the quilts that travel.  Yay!  The quilts look stunning.  

Clicking on this photo will take you to the Aotearoa site, if you want to have a closer look at the entries.  There is also a schedule of where the exhibition will be traveling, for those who would like to see them in person.  

Congratulations to all the participants, winners and to the committee for such an intriguing exhibition.


0 Comments

Project x now on display

7/11/2014

2 Comments

 
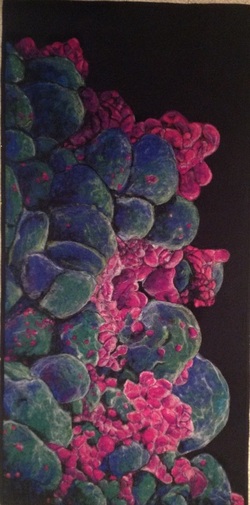
The secret is out.  In the Stanford Gallery, my rendition of the challenge theme "growth" has been displayed.  YES-  So this is the infamous PROJECT X that I was all mysterious about a couple of weeks back.   

      Prognosis; Hope

Picture
This challenge was sure to be interpreted as a verb...and yet my first thought was of a noun.  'A growth.'  
Apparently under an electron microscope, breast cancer cells in the process of destroying themselves look somewhat like this. 
Photo by Annie Cavanagh published on Wellcome Images. USED with permission.  
Hand felting, and machine quilting finally produced this unusual quilt.  Project X completed.
Now it's time to fulfill all the projects that will be provided as potential for Palmerston North.  
Two boxed, one to be boxed.  First a cloth bag....details details details!


2 Comments

Packaging a quilt for posting to an exhibition.

7/8/2014

0 Comments


Time to send off a quilt!

    When packaging a quilt for posting to an exhibition follow instructions.  As oxymoron as this sounds include everything as requested.  If a quilt is to be labeled or have a piece of extra velcro attached...or be in a labeled cloth bag?  Please comply. 
     Committees try to find ways to make the transit from your home to hanging in the Exhibition beautifully and hassle free as possible.  
     Packaging a quilt for posting has basic concepts: 
1.  As previously mentioned it must be clearly labeled and identifiable.  Your name, phone number, email address and any other identifying information should accompany the quilt in such a way that you can be easily re-united with it. That means your information on the quilt, bag, velcro strips etc.
    This also includes any packaging you post the quilt in.  If you tape a packing label onto a box, ensure you also have the information written on the box itself.
2.  The quilt needs to arrive looking tidy.  You have put a lot of effort into your quilt, so make the effort to ensure the judges see it at it's best.  
        Purchase a box that fits the quilt without crushing it.  Place crumpled sheets of acid-free paper between layers helps to prevent sharp creases (if needed).  Ensure that the quilt is in a protective case.  For New Zealand major symposia, a labeled fabric bag is requested. 
     If a fabric bag is not requested for an exhibition, it is still a good idea, or folding the quilt along with a clean sheet.  Layers of protection are beneficial. 
3.  The quilt needs to be kept dry.  In the event your postal box is caught in sudden deluge, it is a good idea to place the fabric bag or sheet wrapped quilt in a plastic bag.  Do this just before mailing, as quilts should never be STORED in plastic.  If you decide to write on the bag with marker or pen, cover the ink with packing tape to prevent any chance of ink transfer.  
     I have been told never to put the quilt in a rubbish bag as it might end up at the tip.  Apparently a transparent bag is suggested.  It's your gamble. 
4.  Return postage and or packaging must be included if the quilt is to be returned. I often provide a prepaid postal bag, as the quilt will be 'home' and doesn't have to arrive uncreased.  
    Although exhibition volunteers will handle your quilt with care, they are handling many quilts so plan on unpacking the quilt as soon as it arrives to reduce stress caused by tight folds or awkward packing.   
5. Insurance is your responsibility.  In the very unlikely event your quilt is damaged or stolen, you will have to be the one to approach your insurance company.   Some home and content insurances will cover a quilt in transit, others require an extra fee.  Do your homework before sending a quilt away if you are worried. .  
       Most exhibition committees take every possible precaution to be responsible with their handling of your pride and joy, but are unable to guarantee the safety of any quilt in transit.  
      In all my years of posting quilts about -including overseas -there have never been any mishaps.  (It is still a good idea to plan ahead.) 
       Happy exhibiting!


0 Comments

Entering an exhibition Part 3- Presentation of a quilt (cont)

7/1/2014

0 Comments

 
Photographing:
     Carefully read the conditions of the particular exhibition you are entering. Most exhibitions want to see what is on offer before committing themselves to display your work.   This is usually by photographs - either physical or on a CD.
    Occasionally you might enter an exhibition that wants you to post the quilt, not a photo.  For traveling exhibitions this is usually the case.  The judges must decide if the quilt is robust enough to withstand many packing and unpacking as well as inspect the quality of the work.  This is an expensive proposition, especially if the quilt isn't selected.  
     As stated before FOLLOW instructions.  Photographing a quilt for presentation can make or break for your quilt's chances of being accepted.  Here is a SHORT video with some basic pointers about photography of a quilt by the official photographer for AQS Quilt Shows in the USA.
     Before photographing or posting a quilt, look it over carefully in good light, ensuring that all loose hair, thread, bits of fluff or such are removed.  
    **Ironically I strongly suggest that you DO NOT USE A STICKY LINT ROLLER to clear batting fluff from your quilt unless you are absolutely sure it isn't bearding. 
     While putting a needle through a quilt, occasionally a tiny bit of fluff from the batting may come through.  If your needle is burred or the fabric is an open weave, this might be visible.  It's called bearding.  
      A bit of fluff sitting on the surface of your quilt is not bearding...bearding is when a bit of the batting is still attached to the mother load.  When you pull a thread of batting off - another follows, just like a box of tissues, only this box just doesn't seem to run out.  
      Usually bearding is not visible, but if it is, a sticky roller will make it worse.  Trust me.  No, I don't want to explain how I found this out, keep reading.
     Best to trim any bearding close or use a long needle to 'sweep' it back under the surface of your quilt. *** 
    Once your quilt is in tip top shape, take photographs of it hanging, preferably in diffused sunlight, without obvious shadows such as a person or a tree branch.  If you have access to a large building, the shaded side may provide a suitable site on a sunny day.  
    No feet or hands should be visible and all of the quilt must show.  The background should not detract from the quilt.  (as mentioned in video) Crop as much of the background out of your photo as you are able. 
    This digital era is an amazing boon for quilters.  I have taken dozens of photos of my quilts back 'in the day' when whatever you had for film was 'it'.  Today a quilter can take dozens and dozens of photos of the same quilt until they land that 'perfect' picture.  Take advantage of that.  It costs nothing to take another shot if you are in any way unhappy with the last.  
      If you present a photo of your quilt in a format such as CD take the time to enlarge the photo on a computer screen and look over every part.   Digitally removing objects from the background is acceptable.  Digitally 'fixing' a drooping corner or messy binding is not acceptable.  The photos must be an honest representation of the quilt.
      Hanging sleeves and/or velcro must be attached as rules dictate. A properly attached sleeve will help to display the quilt to its best advantage.
      Ensure that the back of your quilt is as clean as the front before folding. I usually lay mine out on a clean sheet before folding for storage or shipping.  Remember that any bits of (carpet) fluff on the back have the potential to transfer to the front when folded.  
       Entry forms should be kept tidy, without crinkles or smudges, and writing should be clear and legible.  The quilt should be labeled with the information requested. 
Double check that you have included everything required such as entry fee, return SASE, Cd's, Photos or forms.  Once the entry (or quilt) is posted off, the job of presentation is over.  Time to wait for the notice of acceptance or rejection!

The next Entering an Exhibition blog -Part 4 Packing a quilt for posting.


0 Comments

    Debby's Chat

    Letting you into the inner sanctum of a quilter's thoughts and activities.

    Archives

    June 2021
    May 2021
    February 2020
    January 2020
    December 2019
    October 2019
    December 2018
    November 2018
    October 2018
    January 2018
    December 2017
    October 2017
    December 2016
    July 2016
    June 2016
    March 2015
    February 2015
    January 2015
    October 2014
    September 2014
    August 2014
    July 2014
    June 2014
    May 2014
    April 2014
    March 2014

    RSS Feed